Heated soles manual
Lost your user manual? Here you can access all the information regarding the use of your heated insoles with remote control.
User Manual
Charging:
- The insoles should be fully charged before first use
- Connect the charger with the USB cable to the insole and plug it into the wall outlet.
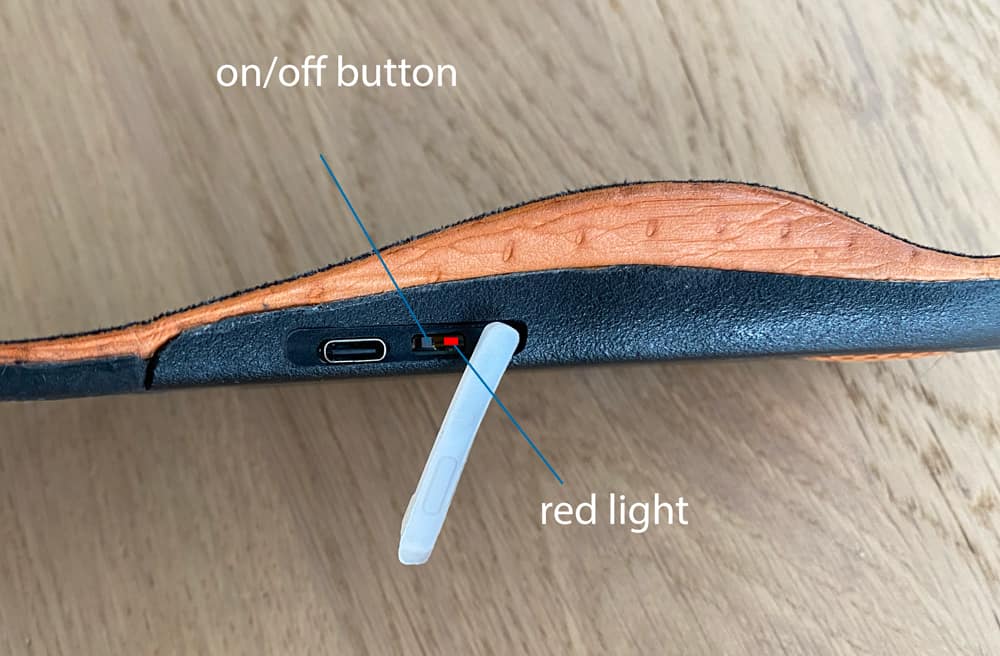
- The red light is on while charging.
- The green light illuminates when charging is complete. This takes +/- 3 hours.
- Now the insoles are ready to place in your shoe.
- Optional: Cut the insoles to size as needed.

Manual operation:
- Press the power button once and the battery will come on in the highest heating mode. Press again to adjust the heating modes. (there are 3 different heating modes)
- To turn off the soles, long press the power button again.
Remote control operation:
- The remote control should work immediately. In case the remote control is not paired, you can:
- 1. Either read the quick guide below
- 2. Either refer to this comprehensive guide: How do I pair the remote control with my heated insoles?
- Press and hold the power button on the side of the insole until the red light begins to illuminate.
- Press on/off again briefly so that the red light will flash.
- Press any button on the remote control, the indicator stops flashing, pairing is done.
- The soles are now easily controlled by remote control.
- After wearing, you can use the remote control to turn off the insoles.
- To turn the insoles back on, you must first press and hold the button on the side of the sole for a few seconds.
- Due to safety reasons, it is not possible to turn on the insoles with the remote control. This can prevent the insoles from being inadvertently turned on when the remote control is in a pocket, for example, causing unwanted rapid battery drain.
- There are 4 buttons on the remote control:
-
- the low heating level
- the medium heating level
- the high heating level
- Off: to turn the system off.
- If the insoles cannot be operated with the remote control, check the following:
-
- The remote control battery is dead.
- The insoles are not enabled to activate the system. Turn it on. To do this, follow the steps above.
Attention!
- Do not wash or soak insoles to prevent shorting.
- Wipe the insoles dry before turning them on.
- To protect the batteries, do not store or use the insoles in high temperature environments.
- In case of non-use, recharge the insoles every 3 months to keep the battery in good quality.
- How to Dispose: The built-in battery and circuit board should be disposed of according to local laws and regulations.
- Set the insoles to the temperature that suits you to prevent burns from overheating.
What is included
One pair of heated insoles PRO or CLASSIC (built-in battery: 3.7V – 2000 mAh)
- Remote control
- 8.4V dual battery charger
- User’s Guide
Heating temperature:
- High level: 55-60°C
- Middle level: 45-55°C
- Low level: 35-45°C
* The warm-up time depends on several factors, such as the ambient temperature and the thickness of the shoes. On average, the warm-up time is between 3 and 7 hours. 3 hours at the highest level and +/- 7 hours at the lowest level.
Heating area
Heating element covers the entire forefoot including the toes.
Warranty
- The warranty period for the insoles covers 12 months from the date of purchase (in case in the product is used correctly)
- Unfortunately, if the soles have been cut off, they cannot be returned. If the soles become defective after cutting, we can make a repair or send a new item.

 One pair of heated insoles PRO or CLASSIC (built-in battery: 3.7V – 2000 mAh)